Skydive Gear
Skydiving Gear Blog Articles and Expert Advices from the skydiving expert at ChutingStar Skydiving Gear SuperStore!
-
Mirage: Data Label, Packing Data Card and Pockets
The Mirage data label is located inside the pocket behind the right mud flap. Pull the label out with the red tab. The label will have the DOM, size, SN, TSO and similar info.
The packing data card is located in the same pocket or in a pocket on the backside of the label. The packing data card has all the container, reserve and AAD info.
Continue reading -
Mirage: Main Pilot Chute Installation
Continue readingThe Mirage Main Pilot Chute is installed by inserting the kill-line, retention strap and bridle from the outside of the D-bag into the inside of the D-bag through the center grommet. Secure the two loops of the bridle inside the D-bag with a metal link or soft link. -
Mirage: Pin Check Procedures
All manufacturer's skydiving rigs are slightly different, so check this video and description out on how to give a pin check and put all the flaps back in place for your buddy's Mirage container.
The reserve pin cover flap can be lifted up to check the reserve pin, reserve closing loop and seal. To reclose the flap, tuck the side flaps first than tuck the bottom of the flap down. Make sure the flaps are fully seated and the flap is flat.
Continue reading -
Basik Seven: Data Label and Pockets
Reach into the pocket behind the pin cover flap stiffener and pull out the label. The DOM, size, SN, TSO and similar info is located on the label. Also inside the pocket will be the packing data card with all the container, reserve and AAD info. It will also have the record of the rigging done to the equipment. Continue readingThe Data Label for the Seven rig by Basik is located in the reserve pin cover flap. Lift up the reserve pin cover flap, which has tuck flaps on the sides and is tucked down at the bottom. -
Basik Seven: Pin Check Procedures
The reserve pin is checked by opening the reserve pin cover flap. Lift up the reserve pin cover flap, which has tuck flaps on the sides and is tucked down at the bottom. The pin, loop and seal can be checked. To close, tuck the tops of the side tuck flaps first, continue tucking the side flaps and then tuck in the bottom section into the pocket. Continue readingAll manufacturer's skydiving rigs are slightly different, so check this video and description out on how to give a pin check and put all the flaps back in place for your buddy's Seven container. -
Internal Audible Mounting in Gath Helmet
An Instructor at Skydive The Farm recently installed the Gath Altimeter Bracket to his Retractable Visor Gath, and found the process a bit tedious. He also discovered the bracket is not a "practical" mount for someone who wants to move an audible frequently from a couple of different helmets as it involves unscrewing part of the mount for removing the audible. So he tried installing the audible on the inside of the helmet by removing part of the Gath padding and securing the audible with Velcro. Continue reading -
Helmet Fit Not An Exact Science
There is not a fail-safe way to know which size of helmet to buy online. Ideally, you would be able to walk into our ChutingStar shop and try a bunch on, or be able to try on helmets at your local drop zone. But for some, it's just not possible. Each manufacturer does post a size chart for its helmets. And that is a great starting point. You'll want to get a soft tape measure, which you can find in the sewing section of any grocery store. Measure around your head, level with your forehead and behind your ears.Continue reading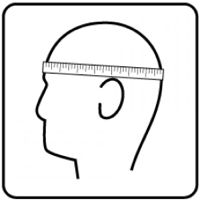 Measure your head as shown above.
 -
Shoe Goo Your Booties!
Booties have become almost standard even for a beginning skydiver’s first belly fly jumpsuit. Booties are extremely beneficial for formation skydiving and tracking. But many skydivers quickly ruin their $400 jumpsuit by walking around in those booties every weekend at the DZ. And it only takes a couple of weekends to wear out the stitching on the sides, causing the bottoms of the booties to fall off. Continue reading -
Skydiving Camera Helmet Mounting Tips
(Published in Blue Skies Magazine) So you’ve racked up those first 200 jumps and you’re itching to throw a camera on your head…or it could be you’re looking to delve into video work to break up the monotony of tandem and AFF jumps…or maybe you’ve finally traded in that old camera setup from the ’70s, and you’re ready to try one of these new-fangled camera setups. In any event, you decided you would just order the new cameras, helmet, box, quick-release, indicator lights, bite switch and the like and assemble it yourself. It can’t be that hard, right? A drill, a screwdriver, maybe some gaffer’s tape, and you’re ready to go. The only problem is, now that you have all the parts in front of you, it’s not making a lot of sense. And you’re a little worried about drilling into your $400 camera helmet and screwing it up so bad that you would have to buy another one. Continue reading -
X-Shut Flush Installation Guide
Start by marking the center of where the mount will be installed. Use a 45mm hole saw to drill the hole for the X-Shut Integration Kit. Insert the outside piece of the integration kit along with the X-Shut base from the outside and mate with the bottom piece of the integration kit from the inside of the helmet. Screw together with the appropriate length of screw (provided with mount). Continue readingThe X-Shut camera mount can be installed on a flat or curved surface with a flush mount by using the Integration Kit. The video demonstrates how the installation is completed.